Smart Control for Clean Water and Lower Energy Bills
Pool maintenance doesn’t have to be expensive or time-consuming. One of the biggest power consumers in any pool setup is the pump. While it’s essential to circulate water and distribute chemicals, many people run their pumps longer than necessary, especially on cooler days. Because the filter requirement is dependent on the temperature – the higher it is, the more filtration and circulation is needed.
So, instead of setting a fixed runtime, I use this rule of thumb:
Run the pool pump for one third of the maximum daily temperature (in °C) in hours.
For example:
- On a 30°C day → 10 hours of runtime
- On a 21°C day → 7 hours of runtime
- On a 15°C day → 5 hours is enough
This strikes a great balance between hygiene and efficiency: on hotter days, you prevent algae and bacterial growth; on cooler days, you save electricity without compromising cleanliness.
I’ve automated this using Home Assistant with a few template sensors and a single automation. Let’s break it all down.
Step 1: Perquisites
I use two helper variables and one integration in the below integration. Make sure they are available in your Home Assistant instance as well:
- 🗓 A Schedule helper named
poolpump_schedule, defining the latest end time. The end time is used as the fixed daily shutdown point. - 🔘 An Input Boolean called
input_boolean.poolpump_automationto manually enable or disable the automation. - 🌡 A weather integration that provides today’s maximum temperature. I use AccuWeather, which exposes
sensor.home_realfeel_temperature_max_0d. - 🎚️ An Input Number helper called
input_number.poolpump_multiplier, which lets you adjust the multiplier (e.g. 0.3 = one third).
Step 2: Create a Sensor to Calculate Pump Runtime
This sensor calculates the number of hours the pump should run today, based on the max temperature and the multiplier — but it will never exceed the number of hours available before the scheduled stop time or 23 hours.
This code must be entered into the configuration.yaml file of your HomeAssistant instance. I use the add-on “file editor” to access and edit the configuration.yaml file.
- sensor:
    - name: PoolMaxTemp
      unique_id: "PoolMaxTemp"
      state: >-
        {% set multiplier = states('input_number.poolpump_multiplier') | float(0.3) %}
        {% set raw_runtime = (states('sensor.home_realfeel_temperature_max_0d') | float(0) * multiplier) %}
        {% set stop_str = states('sensor.next_stop_time') %}
        {% if stop_str not in ['unknown', 'unavailable', 'off'] %}
          {% set stop_time = as_datetime(stop_str) %}
          {% set max_runtime = (stop_time.hour + stop_time.minute / 60) %}
          {% set capped_runtime = [raw_runtime, max_runtime, 23] | min %}
          {{ capped_runtime | round(0) }}
        {% else %}
          {{ [raw_runtime, 23] | min | round(0) }}
        {% endif %}
      unit_of_measurement: "h"
      icon: mdi:water-pump
What it does:
- Input:
sensor.home_realfeel_temperature_max_0d– this should be your weather integration’s forecast for today’s maximum temperature. - Logic: We divide that value by the multiplier (input_number.poolpump_multiplier) to get the desired number of hours the pump should run. If you want your pump to run longer or shorter (depending on pool size, climate, sun, filter and chemicals) adjust the value of that helper in a slider accordingly (the larger the number the longer to pump runs daily)
- Output: A rounded integer value (e.g., 10 for a 30.2°C forecast with a 0.3 multiplier).
- This sensor also makes sure the value never exceeds the end-time of the schedule (number of hours) or is larger than 24h to make sure that the pump will never start before 0:00 of the same day.
Step 3: Get the Schedule End Time
This helper exposes the next scheduled stop time from your schedule helper and is referenced in the other helpers.
This sensor also gets added to the configuration.yaml:
- sensor:
    - name: PoolNextStopTime
      unique_id: "PoolNextStopTime"
      state: >-
        {% if is_state('schedule.poolpump_schedule', 'on') %}
          {{ state_attr('schedule.poolpump_schedule', 'next_event') }}
        {% else %}
          off
        {% endif %}
      icon: mdi:timer-off
What it does:
- It reads the next time your schedule ends and reads that time. You could display the end time of the pump schedule in your dashboard with this helper as well.
Step 4: Calculate Pump Start Time
Here we subtract the runtime from the scheduled stop time to get the pump start time in HH:MM format.
- sensor:
    - name: PumpStartTime
      unique_id: "PumpStartTime"
      state: >-
        {% set runtime = states('sensor.PoolMaxTemp') | float(0) %}
        {% set stop_str = states('sensor.next_stop_time') %}
        {% if stop_str not in ['unknown', 'unavailable', 'off'] %}
          {% set stop_time = as_datetime(stop_str) %}
          {% set start_time = stop_time - timedelta(hours=runtime) %}
          {{ start_time.strftime('%H:%M') }}
        {% else %}
          "Unavailable"
        {% endif %}
      icon: mdi:clock-start
What it does:
- It takes the schedule end time, subtracts the required running duration and then holds the required start time. This time can be displayed in your dashboard and it will be used as trigger for the automation to start the pump.
Step 5: Automation
Now let’s do the automation that does the behind the scenes magic. Starting with the header of the automation, the triggers and conditions. To use this, simply open a new automation, switch to YAML mode and paste this code:
alias: Poolpump-new
description: ""
triggers:
  - trigger: state
    entity_id:
      - schedule.poolpump_schedule
    from: "on"
    to: "off"
    id: "off"
  - trigger: time_pattern
    hours: /1
    id: "on"
conditions:
  - condition: state
    entity_id: input_boolean.poolpump_automation
    state: "on"
What it does:
- The automation triggers as soon as the poolpump schedule turns from ON to OFF. We use this trigger (which we gave the ID “off”) to switch off the pool pump as soon as the schedule ends.
- The second trigger is a time pattern. By using “/1” the automation is triggered every full hour to see if we have to switch the pump on.
- We only want this automation to trigger if the poolpump_automation switch is turned on.
Now the actions section of the automation. Copy that below the first part on line 17:
actions:
  - choose:
      - conditions:
          - alias: Only Turn On If Trigger and Time are True
            condition: and
            conditions:
              - condition: template
                value_template: |-
                  {% set now_time = now().strftime('%H:%M') %}
                  {{ now_time == states('sensor.PumpStartTime') }}
              - condition: trigger
                id:
                  - "on"
        sequence:
          - action: input_boolean.turn_on
            metadata: {}
            data: {}
            target:
              entity_id: input_boolean.virtual_pump
        alias: Turn Pump On
      - conditions:
          - condition: trigger
            id:
              - "off"
        sequence:
          - action: input_boolean.turn_off
            metadata: {}
            data: {}
            target:
              entity_id: input_boolean.virtual_pump
        alias: Turn Pump Off
mode: single
What it does:
- This part of the automation contains two separate sequence parts: one for switching the pump on, and one for off. We distinguish this by using the trigger IDs (“on” and “off” we defined in the automation triggers section earlier.
- When turning the pump to on we have to check if it is already time to turn it on! Because, due to how we setup the automation, this is triggered every hour. We do this using a template and the value of PumpStartTime. We compare the current time with PumpStartTime. If the time matches the pump turns on.
- Secondly, if the trigger is “off” then we turn the pump off.
Final Thoughts
By combining weather-based logic and time-restricted control, you create an intelligent pump automation that:
- Saves energy
- Adapts to daily conditions
- Runs during the warmest part of the day and the period you are most likely to use the pool
- Requires zero manual input once set up but can be designed to usage patterns and individual preferences without coding.
If you’re ready to go even further, you can:
- Notify yourself when the pump is running
- Display start and stop times in a dashboard card for monitoring
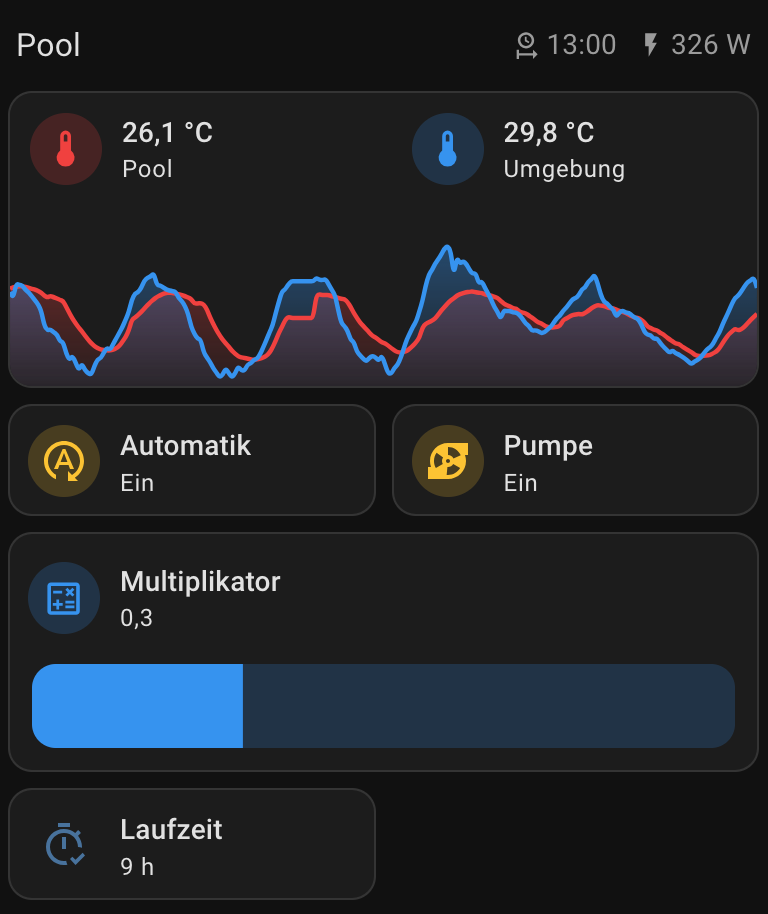
- Get creative when adding the pump-switch, the poolpump_automation switch and the poolpump_multiplier to your dashboard.
To give you an impression of how I visualize this on my dashboard, here is my pool section (including the pool temperature and the power the pump uses)